As someone who has cared for Monsteras for years, I can say this—nothing is more discouraging than spotting brown spots, fuzzy mold, or strange patches spreading across those beautiful split leaves.
Fungus not only ruins the plant’s appearance but can also weaken its health over time.
The good news is that most fungal issues on Monsteras are preventable if you know what to look out for and how to act early.
In this guide, I’ll share what has worked for me and other gardeners: simple, practical, and proven methods to stop fungal problems before they take hold.
Table of Contents
- Understanding Fungal Problems in Monsteras
- Step 1: Water Smartly
- Step 2: Improve Air Circulation
- Step 3: Manage Humidity the Right Way
- Step 4: Clean the Leaves Regularly
- Step 5: Quarantine and Inspect New Plants
- Step 6: Choose the Right Soil Mix
- Step 7: Use Preventative Natural Remedies
- Step 8: Monitor and Act Early
- Common Mistakes to Avoid
- Final Thoughts
Understanding Fungal Problems in Monsteras

Before we talk about prevention, it helps to understand what fungal issues look like. Common fungal problems include:
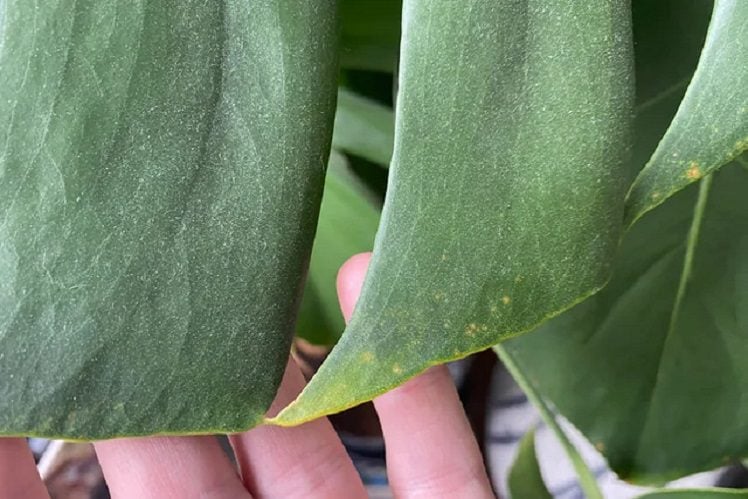
- Leaf Spot Fungus: Small brown or black spots with yellow halos.
- Powdery Mildew: White, powder-like coating on the leaf surface.
- Root Rot (fungal-related): Mushy stems and yellowing leaves caused by overwatering.
- Sooty Mold: Black, sticky mold often growing on honeydew from pests.
Most of these problems thrive in warm, damp, and poorly ventilated conditions. That means the key to prevention lies in adjusting the plant’s environment and daily care.
Step 1: Water Smartly

One of the most common causes of fungal problems in Monsteras is overwatering. When soil stays wet for too long, it becomes the perfect breeding ground for fungus.
Tips for Watering:
- Water only when the top 2–3 inches of soil feels dry.
- Always use pots with drainage holes.
- Empty any water collected in saucers under the pot.
- Avoid splashing water on the leaves—fungus loves wet foliage.
Personal Tip: I like to use my finger to check soil moisture instead of relying only on a schedule. Each home’s humidity and light are different, so the soil dries out at different rates.
Step 2: Improve Air Circulation

Fungus thrives where the air is stagnant. A Monstera placed in a corner with no airflow is far more likely to get fungal leaf spots than one with good circulation.
What You Can Do:
- Place a small fan near your Monstera (set on low).
- Avoid crowding plants too closely together.
- Rotate your plant occasionally so all sides get fresh air.
Better airflow also helps the soil dry out evenly, reducing fungal risks from dampness.
Step 3: Manage Humidity the Right Way

Monsteras love humidity, but there’s a balance to maintain. Too much humidity without airflow can encourage fungus.
- Keep humidity between 50–60%.
- Use a hygrometer to monitor your indoor levels.
- If you use a humidifier, make sure it’s placed far enough to avoid water settling directly on the leaves.
Step 4: Clean the Leaves Regularly

Dust and dirt can trap moisture, which encourages fungal spores to settle. Regular cleaning is not just cosmetic—it’s preventative care.
How to Clean:
- Use a soft, damp cloth to wipe down each leaf.
- Add a tiny drop of mild liquid soap if needed.
- For stubborn spots, I sometimes mix water with a bit of neem oil—it works as both a cleaner and a natural antifungal.
This simple habit keeps leaves glossy and fungus-free.
Step 5: Quarantine and Inspect New Plants

Many fungal issues start when we bring home a new plant that already carries spores.
- Always inspect new plants for spots or mold.
- Keep them separate from your existing plants for at least 2 weeks.
- Use sterilized tools when pruning to avoid spreading spores.
Step 6: Choose the Right Soil Mix

Soil that drains poorly is one of the biggest culprits in fungal problems. Monsteras like soil that holds moisture but still drains well.
Ideal Mix:
- 1 part peat or coco coir (for moisture).
- 1 part perlite (for drainage).
- 1 part orchid bark (for airflow around roots).
This type of mix prevents the soil from staying soggy, which directly reduces fungal growth.
Step 7: Use Preventative Natural Remedies

You don’t have to wait for fungus to appear to take action. Some natural remedies can act as mild preventatives.
- Neem Oil Spray: A natural antifungal that also deters pests.
- Cinnamon Powder: Lightly dusted on the soil surface to discourage fungus.
- Chamomile Tea Spray: Gentle, natural, and effective for leaf fungus prevention.
I use neem oil monthly during the growing season, and it’s helped my Monsteras stay spotless.
Step 8: Monitor and Act Early
The best gardeners know that prevention is not just about habits—it’s also about vigilance.
- Check leaves weekly for spots or changes.
- Remove any infected leaves immediately to stop spread.
- Sterilize scissors with rubbing alcohol after cutting.
Catching fungal issues early means you can stop them before they affect the whole plant.
Common Mistakes to Avoid
- Overfertilizing: Too much fertilizer can stress the plant and make it vulnerable.
- Ignoring drainage: Even the best soil fails if your pot traps water.
- Poor light placement: Low light makes the soil dry slower, which can encourage fungus.
Final Thoughts
Preventing fungus on Monstera leaves doesn’t require complicated steps—it’s all about consistent care. By watering properly, improving airflow, balancing humidity, keeping leaves clean, and acting quickly when you see trouble, you can keep your Monstera vibrant and healthy year-round.
As a gardener, I’ve found that prevention not only keeps fungal issues away but also makes me more in tune with my plant’s needs.
Each leaf becomes a reflection of the care you put in—and when your Monstera thrives, so does your gardening confidence.


