The first time I tried building a garden without digging, I honestly thought it sounded too simple to work. I had always heard that starting a garden meant turning the soil, removing grass, building frames, and spending days preparing the space before planting anything. Then I came across the idea of a no dig garden method built with plain cardboard and compost, and it completely changed the way I looked at gardening.
What made this approach so appealing to me was how practical it felt. I did not need lumber. I did not need raised bed kits. I did not need to hire anyone to till the ground or spend hours breaking up compacted soil.
I could start where I was, using materials that were easy to find and a process that worked with nature instead of fighting it. That alone made it feel more realistic than many other gardening systems I had tried or considered.
After using this method myself, I started to understand why so many gardeners love it. It saves time, keeps the soil structure more intact, reduces weed pressure, and gradually improves the ground beneath the bed.
Instead of disturbing the soil life, I let worms and microorganisms do the work over time. The result was a garden bed that looked simple on the surface but became more alive and productive with each season.
Table of Contents
- Why the No Dig Garden Method Makes So Much Sense?
- The Basic Idea Behind Cardboard and Compost
- Plain Cardboard Smothers Grass Without Harsh Chemicals
- Compost Creates an Instant Growing Medium
- No Frame Needed if the Bed Is Shaped Well
- Worms and Soil Life Do the Real Building Work
- The Soil Gets Better Every Year Without Turning
- What I Would Plant in a New No Dig Bed First?
- Common Mistakes I Try to Avoid
Why the No Dig Garden Method Makes So Much Sense?
The reason this method stood out to me right away was because it removes so many of the usual barriers to starting a garden. A lot of people want to grow food, but they get discouraged by all the preparation work.
Digging out turf, hauling away weeds, building wooden frames, and turning the soil can feel overwhelming before the first plant even goes in.

With the no dig garden method, I can skip much of that frustration. I do not have to strip the site back to bare earth. I do not have to till the soil and bring old weed seeds to the surface.
Instead, I build on top of what is already there. That shift in mindset made gardening feel more accessible and less exhausting for me.
It also makes sense from a soil health perspective. Soil is not just dirt. It is a living system full of organisms that help plants grow. When I dig deeply or till aggressively, I disturb that structure and interrupt the natural relationships happening below the surface. In a no dig bed, I protect the soil while still creating a fertile growing area above it.
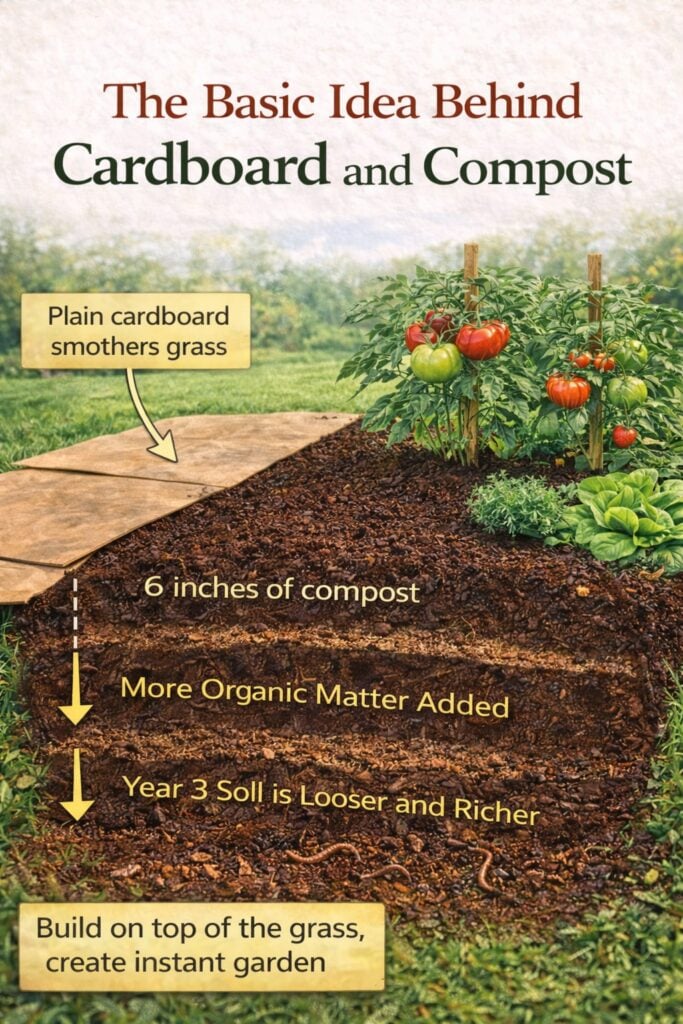
The Basic Idea Behind Cardboard and Compost
At its core, this method is beautifully simple. I lay plain cardboard directly over the grass or weedy area I want to turn into a garden bed. Then I cover that cardboard with a thick layer of compost. That is the foundation.
The cardboard acts as a weed barrier and light blocker. Grass and many weeds cannot survive long without sunlight, so the cardboard helps smother them underneath.
Over time, the cardboard softens, breaks down, and becomes part of the soil system. I always make sure to overlap the pieces well so there are no open gaps where grass can sneak through.
On top of that, I add compost as the growing medium. This is where the magic begins. Instead of waiting months for the ground below to become usable, I instantly create a plantable layer on the surface.
eeds, seedlings, herbs, greens, and even larger vegetables can begin growing in that compost while the layers underneath slowly integrate.
That is what I love most about it. The setup is simple, but it works on multiple levels at once. It suppresses weeds, feeds the soil, and creates a place to grow right away.
Plain Cardboard Smothers Grass Without Harsh Chemicals
One of the biggest benefits I noticed with this method is how effectively plain cardboard deals with grass. If I have ever tried to remove lawn by hand, I know how tiring that job can be. Digging up sod is heavy work, and even after all that effort, some roots often survive.
Cardboard offers a much easier route. Once I place it over the grass, it blocks the sunlight the grass needs to survive. The grass beneath weakens and dies back, while the soil organisms begin breaking the cardboard down.
I do not need herbicides or machinery. I simply let time and coverage do the work.
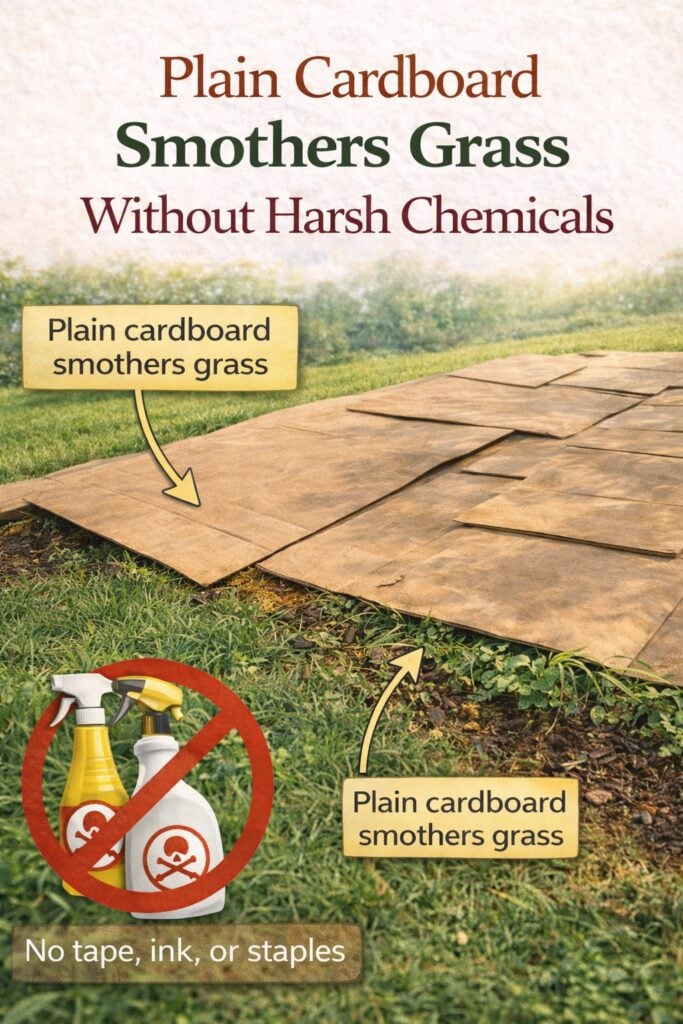
I do pay attention to the type of cardboard I use. I prefer plain brown cardboard without glossy coatings, heavy inks, or plastic tape. I remove staples and packaging tape before laying it down. Then I wet it slightly if needed so it settles well against the ground and stays in place under the compost.
In my experience, this is one of the most satisfying parts of the whole method. It feels resourceful. I am using a common material to solve a common gardening problem in a gentle and practical way.
Compost Creates an Instant Growing Medium
What makes the no dig garden method so immediately useful is the compost layer. Without it, I would just be covering grass. With it, I am creating a real bed that can support plant growth right away.
I usually aim for a generous depth because thin layers dry out faster and leave less room for roots. The image mentions about six inches of compost, and that is a very good target for a new bed.
A deep compost layer gives seeds and transplants enough soft, fertile material to settle into while roots gradually work downward.
Good compost holds moisture well, contains nutrients, and has a loose texture that makes it easier for young plants to establish themselves. That matters a lot in the early stages. If the bed feels light, rich, and crumbly, planting becomes easy and the crops usually respond well.
This is why I think of compost not just as a soil amendment, but as the engine of the whole bed. It turns a weed-suppression layer into a productive garden almost instantly.
When I first saw how quickly plants could establish in a compost-topped bed, I realized this was far more than a shortcut. It was a smarter starting point.
No Frame Needed if the Bed Is Shaped Well
A lot of people assume a neat garden bed needs timber or raised bed walls, but one thing I appreciate about this method is that it can hold itself surprisingly well.
If I shape the compost carefully and define the edges clearly, I can create a tidy, functional bed without any frame at all.
That does not mean the edges stay perfect forever. Rain, foot traffic, and time will soften them somewhat. But for many home gardens, especially informal kitchen gardens, that is not a problem. I can simply top up the bed and reshape the edges when needed.
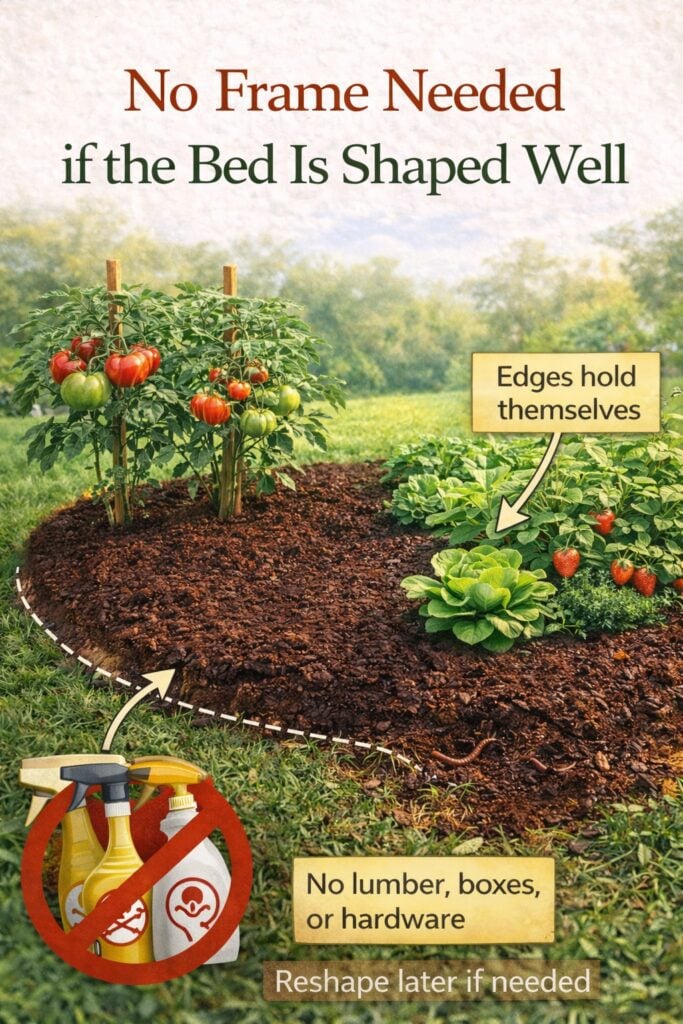
Skipping the frame saves money, reduces setup time, and gives me more freedom with layout. I can make curved beds, long rows, or wide planting zones without needing to cut lumber or measure hardware.
That flexibility makes the garden feel more natural and adaptable.
I have found this especially useful when testing a new garden area. I do not need to commit to a permanent structure before I know whether I like the location. I can build the bed, grow in it, and adjust later if needed.
Worms and Soil Life Do the Real Building Work
One of the smartest parts of the no dig garden method is that it lets the soil improve gradually without me having to turn it over. Underneath the compost and cardboard, worms and microorganisms get to work.
This process may not be dramatic on the first day, but it becomes very noticeable over time. Worms move through the layers, carrying organic matter downward and helping create channels in the soil.

Microbes break down the cardboard and organic material, turning them into forms plants can use. The ground below the bed slowly becomes looser, richer, and more biologically active.
That is why I no longer think of no dig gardening as lazy gardening. It is actually very intelligent gardening. I am not refusing to improve the soil. I am simply letting the soil ecosystem do the improvement in the way it naturally prefers.
When I dig less and feed the top more, the garden often becomes easier to manage. The soil stays more balanced, moisture retention improves, and plant roots seem to move more comfortably through the bed as it matures.
The Soil Gets Better Every Year Without Turning
What impressed me most after using no dig beds for more than one season was how the soil kept improving without dramatic intervention. Instead of starting over every year, I was building on what I had already created.
In a traditional setup, digging and tilling often reset the structure. In a no dig bed, I add more compost to the surface when needed, remove spent crops, and let the lower layers continue developing.
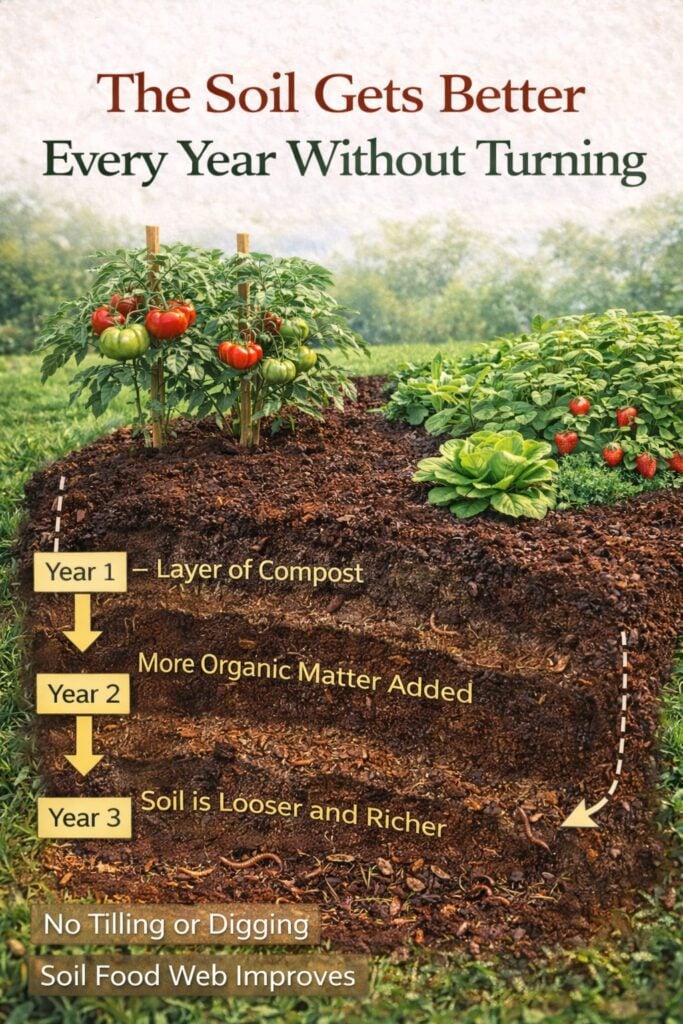
Each season adds another layer of organic matter and another chance for the soil food web to grow stronger.
This long term benefit is one of the main reasons I recommend the method so often. It is not just about making gardening easier this month. It is about creating a system that becomes more fertile and more cooperative over time.
That is also why the method feels sustainable. I am not constantly forcing the bed back into shape. I am guiding it, feeding it, and letting it become better with age.
What I Would Plant in a New No Dig Bed First?
When I start a fresh no dig bed, I like to begin with crops that appreciate rich compost and establish easily. Lettuce, spinach, basil, parsley, radishes, bush beans, and young tomato or pepper transplants often do very well. These crops take advantage of the soft top layer and help me get quick results.
For root crops, I pay a little more attention to how fine and even the compost layer is. Carrots and similar vegetables prefer loose material without too many chunky bits. If the surface is smooth and deep enough, they can still work beautifully.
I also like planting a mix of quick and slow crops. Fast growers give me early success and keep the bed productive while larger crops continue developing. This makes the garden feel alive from the beginning instead of waiting a long time for a payoff.
In my experience, the first season is all about helping the bed settle in while still enjoying a real harvest. That balance is one of the reasons this method feels so rewarding.
Common Mistakes I Try to Avoid
Even though this is a simple method, I have learned that a few mistakes can reduce its success. The biggest one is using too little compost. A very thin layer might not provide enough room for roots or enough moisture retention for strong early growth.
Another issue is leaving gaps in the cardboard. If sunlight reaches patches of grass through those openings, weeds can push through sooner than expected. I always overlap cardboard pieces generously and cover the entire intended bed area.
I also avoid glossy or heavily printed cardboard, and I do not use cardboard with tape left on it. Clean, plain material works best. Finally, I try not to walk directly on the bed after building it.
Even though I am not tilling, compaction can still happen if I repeatedly step where the roots need to grow.
Most of these are easy to avoid, and once I got the basic setup right, the method became very reliable.


