When I first started gardening, my backyard was a blank canvas. It was full of potential but lacked any structure or clear plan. Plants were scattered without any rhyme or reason, and while the space had some charm, it wasn’t reaching its full potential.
I knew that if I wanted a more productive and aesthetically pleasing garden, I needed a solid layout plan.
After some research, I decided to redesign my garden into an organized space that could hold different types of plants and vegetables while being visually appealing.
Table of Contents
Why the Right Layout Matters?
A garden layout is not just about making your backyard look nice—it’s about functionality. If you want a productive space that supports a wide variety of plants, having a thoughtful layout makes all the difference.
For me, the first reason I needed a garden layout overhaul was to create more space for growing vegetables. I wanted to expand my gardening opportunities while still maintaining room for decorative plants and flowers.
A good garden layout also improves the efficiency of gardening tasks. With the proper paths, designated spaces for different plant types, and adequate sunlight for every section, the process of planting, maintaining, and harvesting becomes more manageable.
In short, the right layout ensures that you maximize your space, improve plant health, and reduce time spent on maintenance tasks.
Assessing the Space
Before jumping into any design or layout decisions, I started by assessing my garden’s space. The size, shape, sunlight exposure, and existing features like pathways or trees all influenced my planning.
I took note of how much sun each section of my garden received. Some areas were in full sun for most of the day, while others were shaded by fences or trees.
I also considered the soil conditions—certain parts of my garden had richer soil, while others were more compact and dry.
This assessment helped me decide where to place specific plants.
For example, I wanted to place sun-loving vegetables, like tomatoes and peppers, in the sunniest spots and reserved the shadier areas for plants that thrive in cooler, darker environments, like leafy greens and herbs.
Creating Zones in My Garden
One of the first changes I made to my garden was dividing the space into specific zones. I knew I wanted to grow vegetables, flowers, and herbs, but they needed to be organized in a way that made sense both for the plants’ needs and for my workflow.
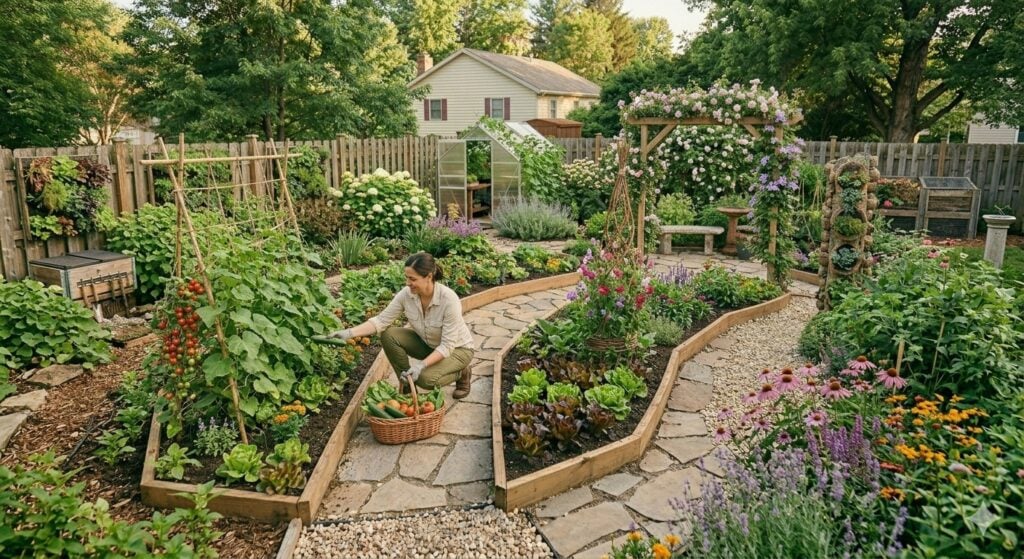
I started by creating raised beds for the vegetables. The layout of these beds followed a grid pattern, with ample space between them for easy access. I also left space for a small flower garden in the center, so it could act as a focal point.

In addition to raised beds, I created a small herb garden along one side. Herbs like basil, mint, and oregano don’t take up much space and are perfect for a smaller, dedicated area.
Finally, I decided to build a small seating area in the corner of the garden. This would serve as a spot where I could relax and enjoy the view of my hard work.
Implementing Paths and Walkways
One of the biggest challenges I faced was figuring out how to move around the garden without disturbing the plants. This is where walkways and paths came in.
I used bricks to create a pathway that wound through the garden, separating the different zones. These paths allowed me to access each section without stepping on the soil or damaging plants.
Plus, they added a rustic, charming aesthetic to the space.
Paths are not only practical but also contribute to the overall look and feel of the garden. They help break up the layout and guide the eyes to different areas, making the space feel more organized and intentional.
The Benefits of Vertical Gardening
As part of my layout transformation, I decided to incorporate vertical gardening. Vertical structures like trellises, arbors, and plant towers are an excellent way to maximize space.

I installed a tall trellis for my climbing plants, like peas and beans, to grow vertically. This saved a lot of space on the ground and allowed me to grow more plants in a smaller area.
Vertical gardening also adds depth to the garden, creating layers of plants that draw the eye upwards. It made my garden feel more dynamic and full, even though I was working with limited space.
Choosing the Right Plants for Each Zone
Now that I had my garden organized, it was time to think about the plants. I carefully chose varieties that would thrive in the specific conditions of each zone.
For the sunniest areas, I planted heat-loving vegetables like tomatoes, zucchini, and peppers. I also included some flowers like marigolds and sunflowers, which thrive in full sunlight and add color and texture to the space.
In the shadier areas, I focused on leafy greens like spinach, kale, and lettuce. These plants thrive in cooler conditions and don’t need as much direct sunlight.
I also planted herbs like parsley and cilantro in these spots.
Finally, the flower garden in the center was filled with a mix of perennials and annuals. I chose plants that would bloom in different seasons to ensure the garden always had something colorful and vibrant.
A Productive and Beautiful Garden
After months of planning, planting, and tending to my garden, I saw the results. The garden was thriving, with healthy vegetables, lush flowers, and fragrant herbs all working together in harmony.
The layout I had carefully designed made gardening easier. I could access every plant easily, and the vertical structures allowed me to grow more in a smaller space.
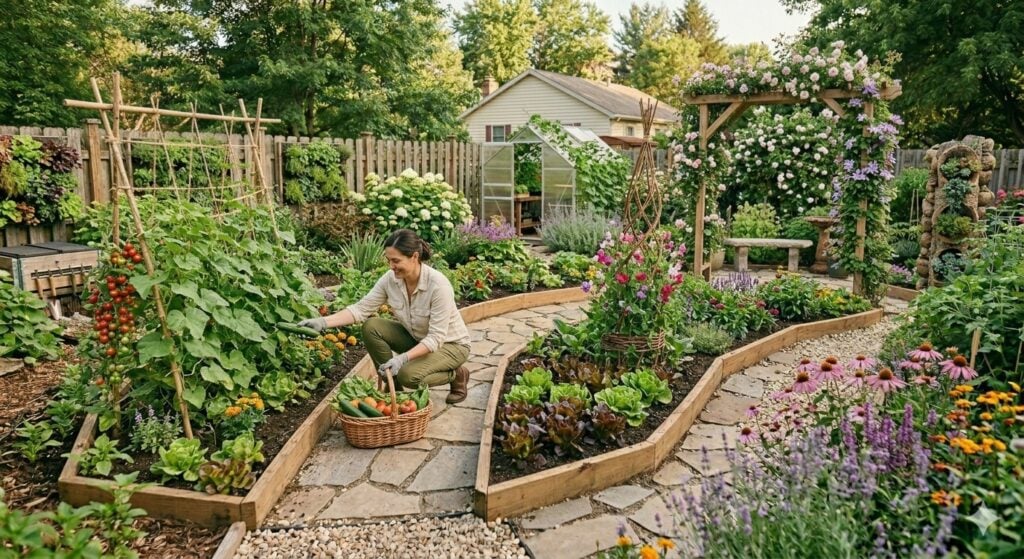
The paths made it simple to move around without damaging anything.
But what surprised me most was the beauty of the space. The grid of raised beds, the flow of the walkways, and the mix of plants came together to create a serene and functional garden.
It was more than just a place to grow food—it became an outdoor sanctuary where I could unwind and connect with nature.
Tips for Designing Your Own Garden Layout
If you’re planning a garden layout transformation, here are some tips that worked for me:
- Plan your garden around the sun. Pay attention to how much sunlight each section of your garden gets and place plants accordingly.
- Use raised beds for vegetables. They improve soil quality, offer better drainage, and make it easier to control the growing conditions.
- Incorporate vertical gardening. Use trellises and towers to grow climbing plants and save space on the ground.
- Create defined zones. Separate your garden into distinct areas for vegetables, flowers, and herbs. This makes the garden easier to manage and gives it a more organized look.
- Add paths and walkways. Create practical pathways that make it easy to move around your garden without disturbing your plants.
- Choose plants that suit your space. Pick plants that thrive in the specific conditions of each zone, whether it’s full sun, partial shade, or deep shade.
- Don’t forget to include a seating area. Having a spot to relax and enjoy your garden will make it a more enjoyable space.
Transform Your Garden with Smart Design
Transforming my garden was one of the best decisions I made. The process wasn’t just about creating a more organized space—it was about creating a space that could support a variety of plants and encourage growth.
With the right garden layout, you can turn your backyard into a productive, beautiful, and relaxing space. Take the time to plan your garden carefully, use the tips I’ve shared, and watch your garden flourish.
Whether you have a large backyard or a small patch of land, you can create a garden layout that works for you and your needs. Happy gardening!


