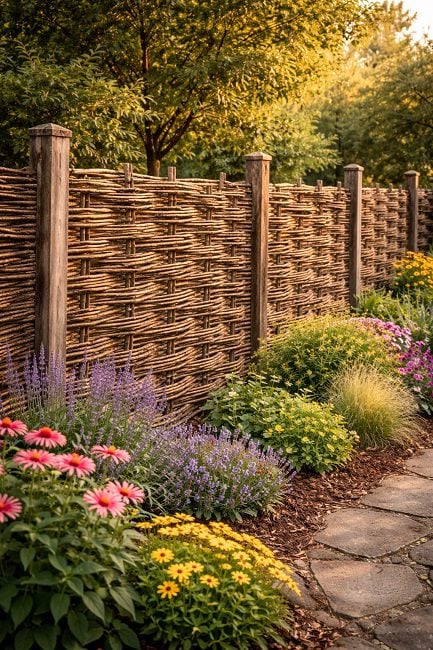
A fence can be both a functional and decorative element in your garden, and if you’re looking for something that offers a natural, rustic charm, a basket weave fence might be the perfect choice.
I’ve built several of these fences in my own garden, and they’ve become one of my favorite garden features.
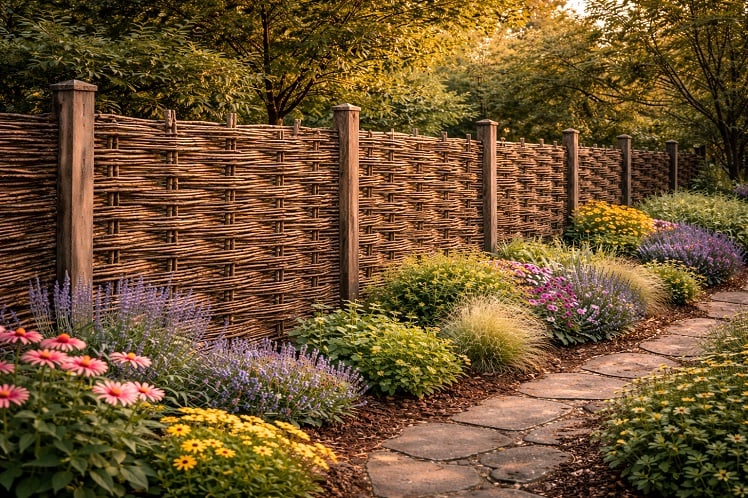
The beauty of a basket weave fence is that it blends seamlessly into the landscape, adds structure without feeling heavy, and can even add a bit of privacy to your outdoor spaces.
What I love most about the basket weave fence is that it is simple to build using natural materials that blend into the garden. It’s not a solid barrier, but rather a textured, organic-looking structure that defines garden beds, paths, or borders, offering both functionality and aesthetic appeal.
Table of Contents
- Why a Basket Weave Fence Works So Well in the Garden?
- Materials You Will Need
- Step 1: Lay Out the Fence Line
- Step 2: Set the Vertical Posts
- Step 3: Prepare the Weaving Material
- Step 4: Begin the Weave
- Step 5: Adjust and Tighten as You Go
- Step 6: Finish the Top Edge
- Helpful Tips for Long-Lasting Results
- Where This Fence Shines?
- Final Thoughts
Why a Basket Weave Fence Works So Well in the Garden?
A basket weave fence is perfect for gardens where you want to add definition without obstructing views. The open weave allows light and air to pass through while still creating a boundary.
It’s a great way to define spaces, like flower beds, vegetable patches, or garden paths, without closing off the area. In my experience, a basket weave fence makes a garden feel more intentional and thoughtfully designed, blending functionality with beauty.
Since it uses flexible wood that weaves between vertical posts, the finished fence has a natural, handcrafted look.
The texture and movement it adds to the space makes it feel organic, rather than rigid or out of place.
Whether you’re aiming to create a boundary around a specific area or just want to frame a garden path, this type of fence offers the perfect balance of structure and visual interest.
Materials You Will Need
Building a basket weave fence doesn’t require a lot of specialized tools, and the materials are easy to find. The main materials I used for my project are:
1. Sturdy Vertical Posts
The foundation of any fence is the posts. For a basket weave fence, you’ll need strong vertical posts. I used hardwood stakes or untreated rot-resistant wood, but you could also use straight branches cut to size.
The key is ensuring that the posts are sturdy enough to hold the weight of the woven strips.
2. Weaving Material
The material for weaving should be flexible, so it bends without snapping. I’ve used split cedar, willow, or hazel branches, as they’re perfect for weaving.
You want long, flexible strips of wood that will easily bend around the posts but still maintain their shape once they’re in place. If you find that your wood is too stiff, you can soak it lightly in water to improve flexibility.
3. Tools
The tools I found most helpful for this project included gloves, a mallet or hammer, a shovel or post driver for driving the posts into the ground, and a pruning saw or hatchet for trimming the wood to the right size.
These tools are simple, and most gardeners already have them.
Step 1: Lay Out the Fence Line
Before you begin building your fence, it’s essential to plan out where the fence will go. I recommend marking the path of the fence with a string line or measuring tape to ensure that the fence stays straight.
I also like to include gentle curves in the design, which not only looks more natural but also makes the weaving process easier.
Sharp angles can make the weaving more challenging and disrupt the flow of the design.
For the spacing between the posts, I suggest leaving about 12 to 18 inches between each post. The closer the posts are together, the tighter and stronger the weave will be.
This also gives the fence a more finished, polished look. It’s important to make sure that the posts are placed evenly and in a straight line, as this will help create a uniform, aesthetically pleasing result.
Step 2: Set the Vertical Posts
Once the location is marked out and you’ve planned the layout, it’s time to set the vertical posts. I recommend using a post driver or a shovel to dig holes for the posts.
The posts should be driven or dug deep enough to stay firmly in place. I’ve found that digging at least 1/3 of the length of each post into the ground works best.
This helps the posts stay upright and strong, even as the weight of the woven wood starts to pull on them.
Once the posts are in place, make sure the tops are level. I’ve learned that a consistent height across the top of the posts is important for the final look, but slight variations add to the natural character of the fence.
After the posts are set, pack the soil around them tightly to keep them secure. You’ll want them to be solid and stable for the weaving process.
Step 3: Prepare the Weaving Material
Before you start weaving, sort your strips of wood by length and flexibility. I use thicker, more rigid pieces near the bottom of the fence, and thinner, more flexible strips as I move upward.
This allows the base of the fence to be sturdier, while the top remains flexible and more visually delicate.
If the wood feels stiff or difficult to bend, you can soak the strips in water for a few hours to make them more pliable. This step is especially important when using materials like willow or hazel, which can be difficult to work with if they’re too dry.
Once the wood is soft and flexible, it’s ready to be woven into the fence.
Step 4: Begin the Weave
Start at the bottom of the fence, near the ground. Take a long strip of wood and weave it in and out of the posts, alternating sides as you go. I make sure to push the strip snugly down against the soil, which helps secure it in place.
The first few strips are the most important because they establish the pattern of the weave.
As you continue, use the next strip to weave in the opposite direction so that it locks the previous strip in place.
I’ve found that alternating the direction with each new strip creates a stronger, more stable weave. It also helps prevent the strips from slipping out of place as the fence grows taller.
As you build the fence, keep a steady tension on the strips to ensure that the weave is tight. It’s important to maintain this tension so that the fence stays sturdy and holds up over time.
I also occasionally use a mallet to gently tap the strips down as I go, which helps tighten the weave.
Step 5: Adjust and Tighten as You Go
As the fence grows taller, step back periodically to check for any uneven sections. It’s normal for some parts of the fence to look a little wonky, but keeping the tension consistent and adjusting as you go will help maintain an even, balanced look.
If a strip sticks out too far, simply trim it with a pruning saw or hatchet and tuck it behind the posts.
It’s essential to keep the weave as tight as possible while still allowing room for the plants to grow.
The final result should look neat but natural. I’ve found that slightly uneven sections or gentle variations in height only add to the charm of the fence.
Step 6: Finish the Top Edge
Once the fence reaches your desired height, it’s time to finish the top edge. I like to use a slightly thicker strip of wood or a horizontal cap to finish the fence. This provides extra stability and helps hold the weave in place.
The cap also gives the fence a more polished, finished appearance. It’s not essential, but it definitely adds a nice touch.
Helpful Tips for Long-Lasting Results
To ensure that your basket weave fence lasts for many years, it’s important to use rot-resistant wood. This will prevent the wood from deteriorating over time, especially if it’s exposed to moisture.
I also make sure that the bottom of the fence is slightly above constantly wet soil, as this helps reduce the risk of decay.
As the wood dries out and settles, it may shift slightly, but this is normal. Over time, the fence will become tighter and more cohesive as the plants grow and fill in the gaps.
I’ve found that this natural settling process only enhances the charm of the fence.
Where This Fence Shines?
A basket weave fence works beautifully in garden beds, along paths, or as a border for garden areas where you want to define the space without blocking views.
The open weave allows light and air to flow through, making it ideal for garden areas filled with flowers, herbs, and other plants.
It can also be used to create a natural boundary along a garden path or as a decorative edge around flower beds.
In my experience, a basket weave fence blends effortlessly into natural landscapes, enhancing the overall aesthetic of the garden while still providing structure and definition.
Final Thoughts
Building a basket weave fence is a fun, straightforward project that brings both beauty and functionality to your garden.
By following these simple steps, you can create a fence that enhances your outdoor space, defines garden areas, and provides a beautiful framework for climbing plants.
Whether you’re looking to add a decorative element to your garden or need a functional, low-maintenance fence, a basket weave fence is an excellent choice.
I’ve thoroughly enjoyed building mine, and I believe it’s one of the best ways to add charm and character to any garden.


