I started with a single healthy aloe vera plant in a bright windowsill and realized that its potential extended beyond one pot. I wanted to create a whole collection without buying new plants.
By learning how to encourage pups and propagate them, I transformed one plant into many. This not only gives me backups and gifts for friends but also helps keep the mother plant healthier by reducing crowding.
I quickly realized that propagation is a sign of a strong, well-cared plant.
When I see pups forming, I know the plant is thriving and ready for expansion. It became one of my favorite projects because it combined creativity, practicality and a steady reward.
Table of Contents
- Understanding What Aloe Vera Pups Are
- The Conditions I Create to Encourage Lots of Pups
- Step-by-Step: How I Remove and Plant Pups?
- My Aloe Vera Multiplication Workflow
- Tips I Use to Multiply Aloe Faster
- Problems I’ve Encountered and How I Fix Them
- What I’ve Learned About Timing and Growth?
- Why Multiplying Aloe Vera is Worth It?
Understanding What Aloe Vera Pups Are
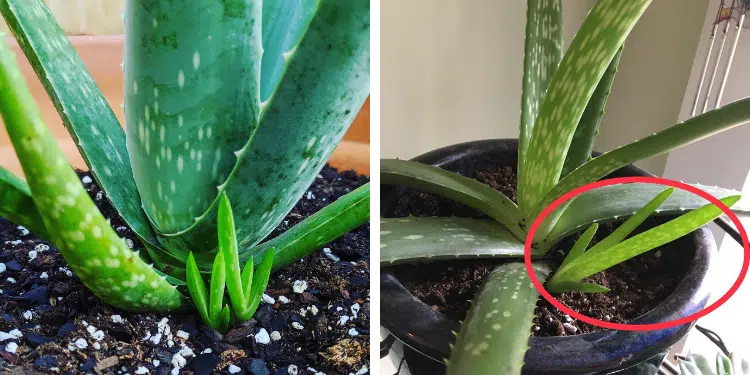
In my aloe-growing journey I discovered that pups are the small offshoots that grow at the base of the mother plant. These are miniature versions of the main plant that gradually develop their own roots and can be separated.
Pups are the easiest way to multiply aloe vera because they already have a head start.
By identifying and removing these pups at the right time I make sure each new plant has the best chance of survival. Understanding the pup stage transformed propagation from guesswork into a reliable process.
The Conditions I Create to Encourage Lots of Pups
I found that getting my aloe vera to produce pups more quickly depends on giving it the right care. I follow these conditions to encourage growth:
- Good light: I aim for bright, indirect light or a few hours of direct sun a day.
- Slight root-crowding: I let the plant fill its pot before separating offshoots, so it naturally triggers propagation.
- Proper soil and drainage: I use a cactus or succulent mix so roots stay healthy and moisture is well controlled.
- Balanced watering: I water deeply but infrequently, allowing soil to dry between waterings so the plant focuses energy on pups.
By maintaining these conditions I consistently see more pups. The plant responds by producing new growth and I harvest new plants with confidence.
Step-by-Step: How I Remove and Plant Pups?
Here are the steps I use whenever I’m ready to multiply my aloe vera plant. I keep it simple, clear and repeatable.
- I remove the mother plant from its pot and gently shake off excess soil to expose the base and roots.
- I identify pups that are at least 2-3 inches tall and have some visible roots or stems.
- I gently separate the pup from the main plant, making sure to include some roots or basal stem.
- I let the separated pup rest in a dry, airy place for one to two days so the cut or broken area can callous over.
- I prepare a small pot with well-draining succulent soil and plant the pup just at soil level, leaving leaves and stem above the surface.
- I give only light watering initially and place the pot in bright indirect light while the pup establishes.
- After a few weeks I resume normal succulent care and watch the new plant grow.
These steps help me avoid common setbacks such as rot or failure to root. With patience and steady conditions I regularly generate new aloe plants from one original.
My Aloe Vera Multiplication Workflow
| Stage | What I Do? | Why It Matters? |
|---|---|---|
| Preparation | Use mature plant, well-draining soil | Supports healthy growth and pups |
| Separation | Remove pups carefully once rooted | Gives each new plant better chance |
| Callousing | Let cut base dry 1-2 days | Prevents rot when planted |
| Planting | Use small pot, full succulent mix | Appropriate size and drainage |
| Establish | Light watering, bright indirect light | Supports root development |
| Care | Return to regular care after establishment | Ensures long-term success |
Tips I Use to Multiply Aloe Faster
From my experience I’ve found several extra practices that help accelerate pup production and improve propagation success.
- I avoid fertilising heavily. Since aloe grows slowly, excess nitrogen pushes leaf growth but not pups.
- I clean the crown and soil surface so there is no debris or old leaves that could reduce airflow.
- I rotate the pot occasionally so each side receives light and the plant remains balanced.
- I inspect for pests and treat early; healthy plants propagate more easily.
- I keep the mother plant in a slightly snug pot to encourage it to divide and produce pups naturally.
These subtle actions make a significant difference over time. They help the overall plant ecosystem rather than focusing solely on separation.
Problems I’ve Encountered and How I Fix Them
Even with good care I’ve had moments when propagation failed or slowed. Here are common problems I’ve faced and my solutions.
1. Too few or no pups
Sometimes the mother plant refuses to produce offshoots. I found this happens when light is insufficient, roots are unhealthy or the plant is too new.
My fix: I improve light, check roots for health and avoid propagation until the plant has matured at least 2-3 years.
2. Pups removed too early
I once separated very small shoots that lacked roots and they failed to establish. Now I wait until pups are visible and show signs of root or stem development before removal. This greatly increases success.
3. Rot or mushy base
In several cases the pup or the mother showed soft base or rot.
My solution: I lighten the soil, ensure excellent drainage, reduce watering and allow pup bases to callous before planting. Good drainage has solved nearly all rot issues for me.
4. Over-watering pups
New plants are vulnerable to moisture problems. I err on the side of dryness—water lightly, wait for dryness, then resume normal care. This simple change improved survival rates for me.
What I’ve Learned About Timing and Growth?
The time it takes for pups to form depends on several factors. From my observations:
- A strong, well-established mother plant may begin producing pups every few months.
- Environmental stress like being root-bound or slightly dry often triggers more pups.
- Warmer months and good light accelerate pup formation, though propagation can happen year-round indoors.
- Newly separated pups usually show new growth or root anchoring within 4-8 weeks if conditions are right.
This timeline helps me plan when to remove pups, repot or prepare new containers. It also helps me track progress and manage expectations. I rarely expect overnight multiplication; instead I aim for steady, reliable growth.
Why Multiplying Aloe Vera is Worth It?
Growing more aloe plants has practical and aesthetic benefits. I now have backups of my favorite plant in case something happens to the mother. I have extras to gift to friends or sell in garden swaps.
I use the new plants for experimenting with different containers or locations without risking the main plant.
Beyond that, the process itself gives me a sense of accomplishment—it feels like I’m harvesting from a living system I created. It also deepens my connection to the plant by teaching me patience, observation and care.


