A winding brick path does more than connect one part of the garden to another. It shapes how people move through the space, protects planting beds from foot traffic, and gives a yard the timeless charm associated with English cottage gardens.
A dry laid brick walkway is especially appealing because it can look custom and high end without requiring poured concrete or advanced masonry skills.
Done properly, it is also easier to repair than a mortared path because individual bricks can be lifted and reset if the ground shifts.
That practicality matters at a time when homeowners are investing heavily in outdoor living and curb appeal, while cities and designers are paying closer attention to drainage, flooding, and the environmental performance of hardscape materials.
Table of Contents
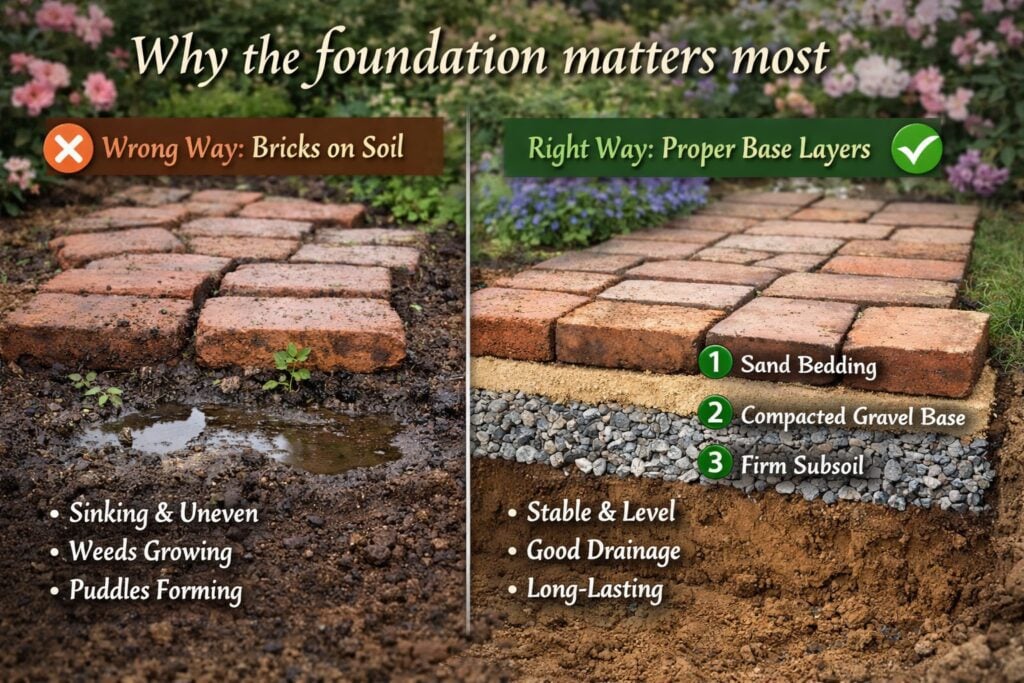
Why the foundation matters most?
The most important lesson in building a brick path is simple: the visible bricks are only as good as the invisible base beneath them. Guides from home building experts consistently emphasize that pedestrian pavers need a compacted base layer plus a bedding layer, not direct placement on soil.
Soil expands, contracts, and softens when wet. If bricks are laid straight onto topsoil, the path may settle unevenly, collect puddles, and become a tripping hazard.
For a typical walkway, a paver base of roughly 4 to 6 inches is commonly recommended, with deeper bases for heavier loads.
That is why excavation comes first. Mark the route with garden hoses or marking paint and test the curves before digging. Then excavate about 6 to 8 inches deep, or more if your soil is weak or your climate has freeze thaw cycles. Remove roots, weeds, and loose organic matter until you reach firmer subsoil.
This step feels slow, but it determines whether the path still looks crisp two winters from now. In practice, many failed DIY paths are not ruined by poor brick laying but by insufficient digging and weak compaction at the beginning.
Step 1: Create a stable, draining base
Once the trench is dug, install the structural base. Crushed gravel or paver base is used because it locks together under compaction while still allowing drainage.
Spread it in layers if necessary, then compact thoroughly with a hand tamper for very short paths or a rented plate compactor for longer sections. Multiple passes are better than one quick pass. Good compaction reduces future settling and helps the path resist movement after storms.

Drainage is a major reason this step matters. The base should shed water rather than trap it under the bricks. Landscape and stormwater experts increasingly point to paving choices as part of broader runoff management.
Green infrastructure guidance notes that permeable surfaces and better stormwater design can reduce flooding pressure, improve water quality, and support healthier landscapes.
Even if a traditional dry laid brick path is not fully permeable, building it with drainage in mind is still far better than laying bricks over bare soil or dense, poorly drained clay.
Step 2: Add the bedding layer carefully
After the base is compacted, add about 1 inch of coarse sand or stone dust. This is not the structural layer. Its job is precision. It gives you a thin, workable bed for leveling the bricks.
Oregon State guidance on paver installation describes this bedding layer as the surface into which pavers are set, and recommends screeding it smooth rather than compacting it first.
A straight board riding on guide rails or pipes is commonly used to create an even plane.

This is the stage where patience pays off. Once the sand is screeded, do not walk over it casually. Footprints create low spots that will later telegraph through the finished path.
Many DIY builders underestimate how sensitive the final surface is to tiny irregularities in this layer. Think of the bedding sand as your final chance to make the path feel professionally built underfoot.
Step 3: Lay the bricks With both beauty and practicality in mind
Now the project becomes visually rewarding. Place each brick straight down onto the bedding layer instead of sliding it across the sand. Sliding disturbs the leveled bed.
Keep the joints consistent and use a spirit level often. A rubber mallet helps tap high bricks into place without chipping them.
Home repair experts often recommend beginning from a fixed edge and working outward so the pattern stays aligned.

For a curved garden path, a running bond pattern is often the smartest choice. It looks classic, handles curves more easily than many formal patterns, and reduces cutting. That makes it especially suitable for first time builders.
More decorative layouts such as herringbone can be stronger in some contexts, but they also create more waste and complexity on winding routes. From a supportive perspective, this is one reason dry laid brick paths remain popular: they offer a high design payoff with a relatively approachable learning curve.
From a critical perspective, however, they still demand care, physical effort, and accuracy. What appears simple in a photograph can become hard labor over even a modest distance.
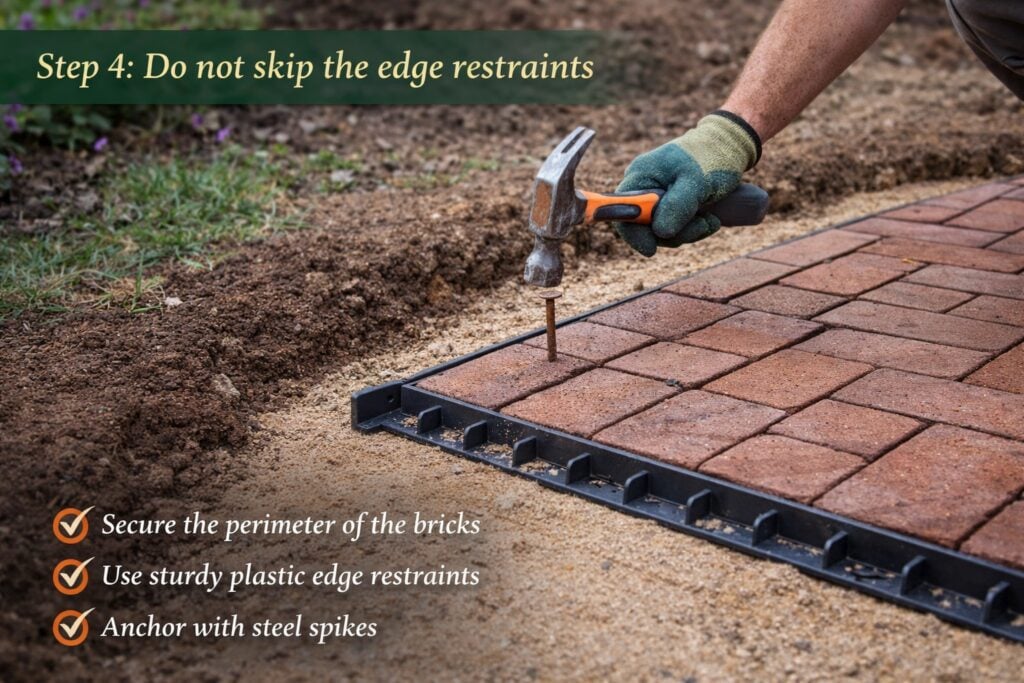
Step 4: Do not skip the edge restraints
One commonly overlooked detail is the edge restraint. Dry laid systems need some kind of border support or the bricks will gradually spread outward. Professional guidance warns that pavers without edge restraints lose integrity over time.
The restraint may be plastic, metal, wood, stone, or a concealed concrete edge depending on the design. In a cottage garden, hidden restraints are often preferred because they preserve the soft, old world appearance.
This detail illustrates two different schools of thought. Purists may prefer a looser, aged look that allows some soft settling and slight irregularity.
Practical builders argue that restrained edges are what separate a romantic path from a maintenance headache. For most homeowners, the second view is more useful.
Step 5: Lock the bricks together
Once all bricks are installed, sweep fine jointing sand into the gaps. Polymeric sand is often favored because it hardens when activated with water, helping resist weed growth and insect disturbance.
Then compact the surface, ideally with a plate compactor fitted with a protective pad, and sweep in more sand if the joints settle.
Finally, mist the path to set the joints according to the product instructions.

At this point, the path should feel firm, even, and integrated. The beauty of dry laid construction is that the system works as a whole.
The gravel provides strength, the bedding layer provides accuracy, the bricks provide the wearing surface, and the joint sand helps the path act like one interlocked field rather than hundreds of separate pieces.
Real world impact on homeowners and communities
For individual homeowners, a brick path can improve safety, usability, and property appeal. It keeps shoes out of mud, guides guests through the garden, and can elevate the perceived value of an older home. It also remains repairable.
If a tree root lifts a section later, the affected bricks can be removed, the base corrected, and the path reset without demolishing the entire walkway.
At the community and environmental level, the conversation is broader. Designers and city planners are increasingly interested in how paving choices affect runoff, flood resilience, and urban heat.
Recent planning and resilience discussions have highlighted permeable paving, rain gardens, and infiltration based landscape systems as tools for managing stormwater more responsibly. That does not mean every brick path must become a fully permeable engineering system.
It does mean that even small residential projects now sit inside a larger debate about landscape sustainability.
Challenges and future implications
There are honest drawbacks. Brick paths require significant labor, especially excavation and compaction. They can develop weeds if the joints are poorly maintained.
In freeze prone regions, bad drainage can cause movement. And in some climates, a more permeable paving system may be preferable from an environmental standpoint.
Critics also note that homeowners sometimes copy the look of a traditional path without adapting the build to local soil, rainfall, or drainage needs.
Still, the future for this type of project looks strong. Outdoor living remains a major home improvement priority, and landscape practice is moving toward solutions that combine beauty with better water management.
The likely next step is not the disappearance of brick garden paths, but smarter versions of them: better base design, stronger edge restraint, and more attention to runoff, infiltration, and repairability.


