The first time I learned how to build a bumblebee nest, I was surprised by how simple and natural the whole idea was. I used to think helping bees meant planting flowers only, but then I realized that pollinators also need safe places to live, rest, and raise their young.
Bumblebees are gentle, hardworking insects that play a huge role in pollinating flowers, fruits, vegetables, and wild plants.
When I look at a garden full of life, I often think about the tiny creatures working quietly behind the scenes. Bumblebees are part of that hidden world. They move from flower to flower, carrying pollen and helping plants reproduce.
Without them, many gardens would feel less alive.
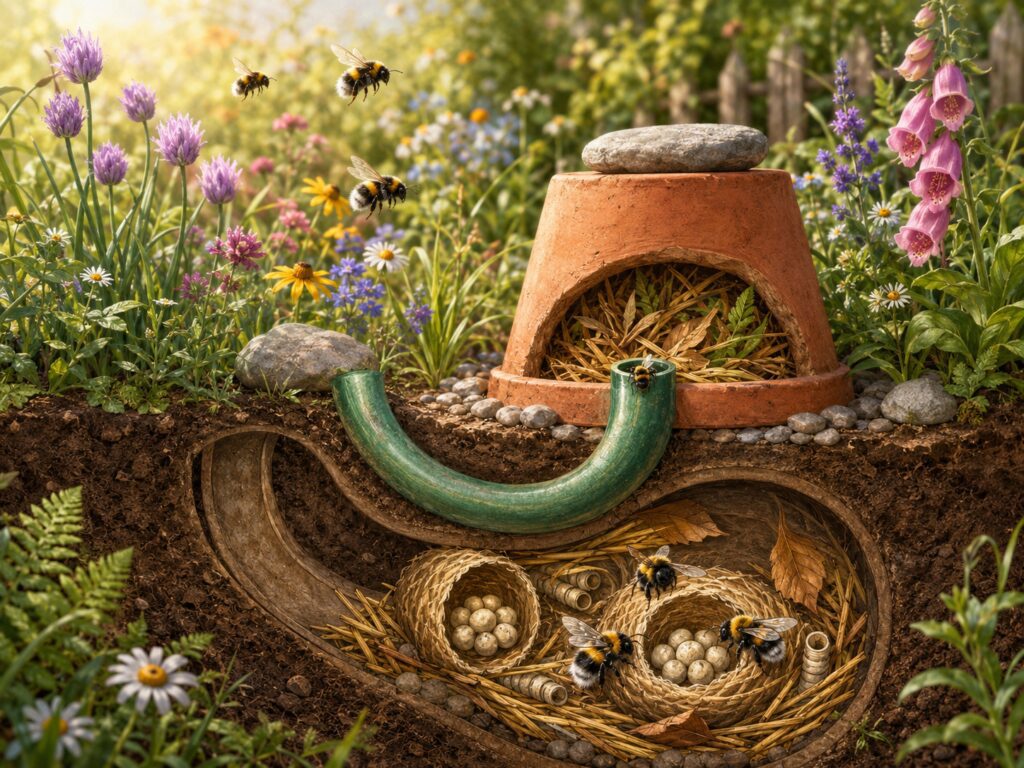
The image shows a simple underground bumblebee nest made from an upturned plant pot, a curved hosepipe entrance, nesting material, pebbles, and a stone placed on top.
It looks rustic, practical, and very close to what bumblebees naturally look for in the wild.
Many bumblebees naturally nest in old rodent holes, under grass, in compost heaps, or in sheltered cavities. A homemade nest like this tries to copy that safe, hidden environment.
Table of Contents
Why I Like the Idea of a Bumblebee Nest?
Before building anything in the garden, I always ask myself one simple question: will this help nature, or will it disturb it?
That is why I like this kind of bumblebee nest. It uses basic materials, blends into the garden, and creates a sheltered space that feels natural. Instead of a plastic decorative object, this nest is more like a small underground refuge.
Bumblebees are different from honeybees. They do not usually live in large permanent colonies. Their nests are seasonal. A queen starts the nest, raises workers, and the colony grows during the warmer months.
Later, new queens leave to overwinter somewhere safe, while the old nest naturally comes to an end.
This means a bumblebee nest in the garden is not usually a forever structure filled with bees all year. It is a seasonal home. That makes it easier to manage and less intimidating for people who are nervous around bees.
I also like that this project encourages a slower way of gardening. Instead of controlling every corner, I leave small spaces for wildness.
A shady patch, some dried leaves, a few stones, and a hidden tunnel can become something meaningful.
Choosing the Right Location
The most important part of building a bumblebee nest is choosing the right spot.
I would choose a shady, quiet area of the garden where the soil does not get too hot during the day. Bumblebees prefer sheltered places, and a nest that overheats can become dangerous for them.
A location under a hedge, near tall grass, beside a shrub, or along a quiet garden border can work well.
I avoid placing the nest in a busy pathway, near a door, close to children’s play equipment, or beside a seating area. Even though bumblebees are usually calm, they can defend their nest if they feel threatened.
A peaceful location helps both the bees and the people around them.
The spot should also have some protection from heavy rain. I do not want water to flow into the hosepipe entrance or collect inside the plant pot. Good drainage matters because damp nesting material can become moldy and unhealthy.
When I imagine the perfect spot, I think of a place that feels hidden but not completely buried in wet soil.
It should be cool, stable, and undisturbed.
Materials I Would Use
A good bumblebee nest does not need expensive materials. In fact, I prefer using simple garden items because they look and feel more natural. For this project, I would prepare an old terracotta plant pot, a piece of hosepipe, straw, dried leaves, small pebbles, a flat stone, and some loose soil.
A terracotta pot works well because it is breathable and blends beautifully with the garden. Plastic pots can work too, but I personally prefer terracotta because it feels more natural and solid.

The hosepipe becomes the entrance tunnel. It should be wide enough for bumblebees to move through easily.
I would avoid using a pipe that is too narrow, too long, or sharply bent. The curve should feel smooth and simple.
For nesting material, I would use dry straw, dried grass, moss, or dried leaves. I would avoid anything treated with chemicals, strong scents, pesticides, or artificial fragrance.
Bumblebees are sensitive creatures, so natural and dry materials are always better.
The pebbles help mark and support the entrance area. The stone on top of the pot helps cover the drainage hole and adds weight, keeping the structure stable.
Preparing the Plant Pot
The plant pot is the heart of the nest, so I take time to prepare it properly.
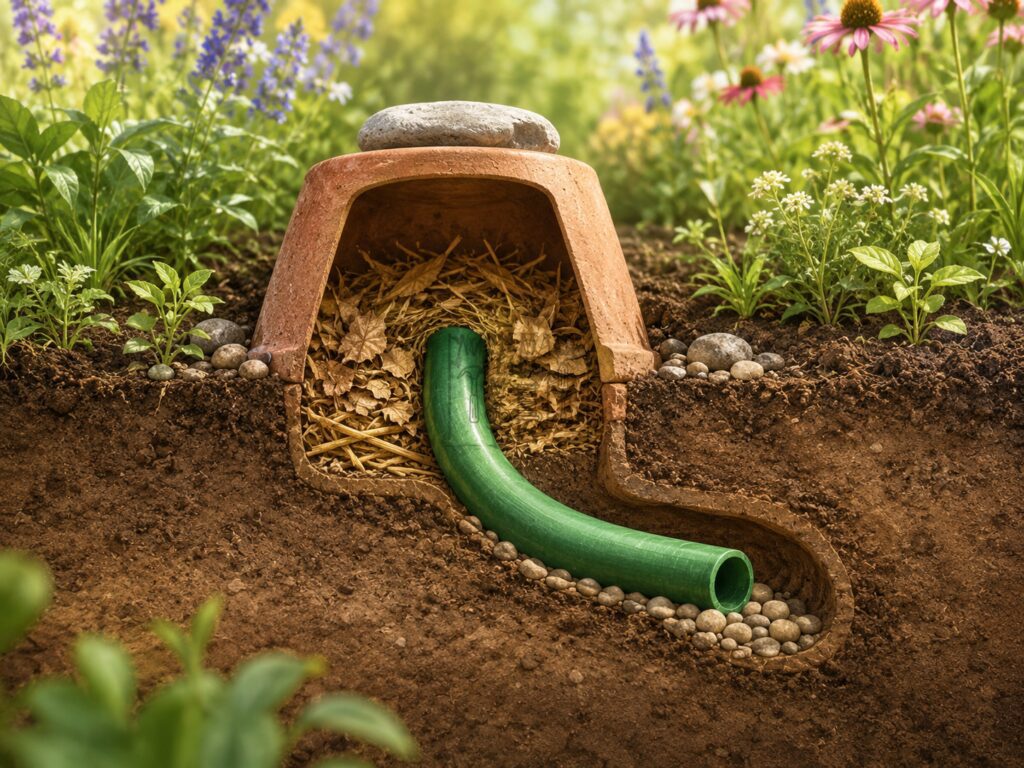
I turn the plant pot upside down, just like in the image. This creates a small underground chamber. Before burying it, I fill the inside with soft, dry nesting material. I do not pack it too tightly.
Bumblebees need space to move and shape the nest naturally.
I like to imagine the inside as a cozy hollow, not a stuffed container. A loose mix of straw and dried leaves gives the queen material to work with. In nature, bumblebees often reuse abandoned nests or cavities that already contain soft material.
This homemade version is simply trying to provide that same comfort.
The drainage hole at the top should be covered with a stone. This helps stop rain from entering directly through the top. It also keeps the nest darker inside, which bumblebees usually prefer.
When placing the pot into the ground, I partially bury it. I do not leave it fully exposed because underground shelter helps regulate temperature. I also do not bury it so deeply that water collects around it.
Balance is important.
Creating the Entrance Tunnel
The hosepipe entrance is one of the most interesting parts of the design.
In the image, the hosepipe is placed inside the plant pot and bent upward to create an entrance tunnel. This is a clever idea because it copies the kind of tunnel bumblebees might find in nature, such as an old mouse hole.
When I place the hosepipe, I make sure one end leads into the pot chamber and the other end opens outside the soil.
The outside entrance should be visible enough for a bee to find but not so exposed that rain, wind, or predators easily enter.
I would keep the entrance slightly raised or angled so water does not run down the pipe.
If the entrance sits lower than the surrounding soil, rainwater may flow inside. That is one of the biggest mistakes to avoid.
Around the entrance, I would place small pebbles to keep the opening clear. This also helps stop loose soil from collapsing into the pipe. The entrance should look natural, almost like a small burrow hidden among stones and grass.
Adding Nesting Material
The nesting material is what makes the chamber feel inviting. I would use dry straw, dried leaves, fine dry grass, and possibly a little moss.
The key word is dry. Wet material can rot, smell, or attract unwanted pests. I never use fresh green leaves because they hold moisture and break down quickly.
I also avoid cotton wool or synthetic fibers. They may seem soft, but they can trap moisture or tangle around insects. Natural materials are safer and more breathable.
When I place the material inside the pot, I leave a small hollow in the middle. I do not try to shape a perfect nest. Bumblebees will arrange things in their own way if they move in.
My job is only to prepare a comfortable starting point.
The image shows straw, leaves, and dry material filling the pot, which is a good visual reminder that bumblebee homes do not need to be neat. They need to be sheltered, dry, and natural.
Covering and Securing the Nest
Once the pot, hosepipe, and nesting material are in place, I gently cover the structure with soil.
I keep the entrance tunnel open and visible. Then I press the soil lightly around the pot so it stays secure. I do not compact the soil too hard because that can trap moisture and make the area less breathable.
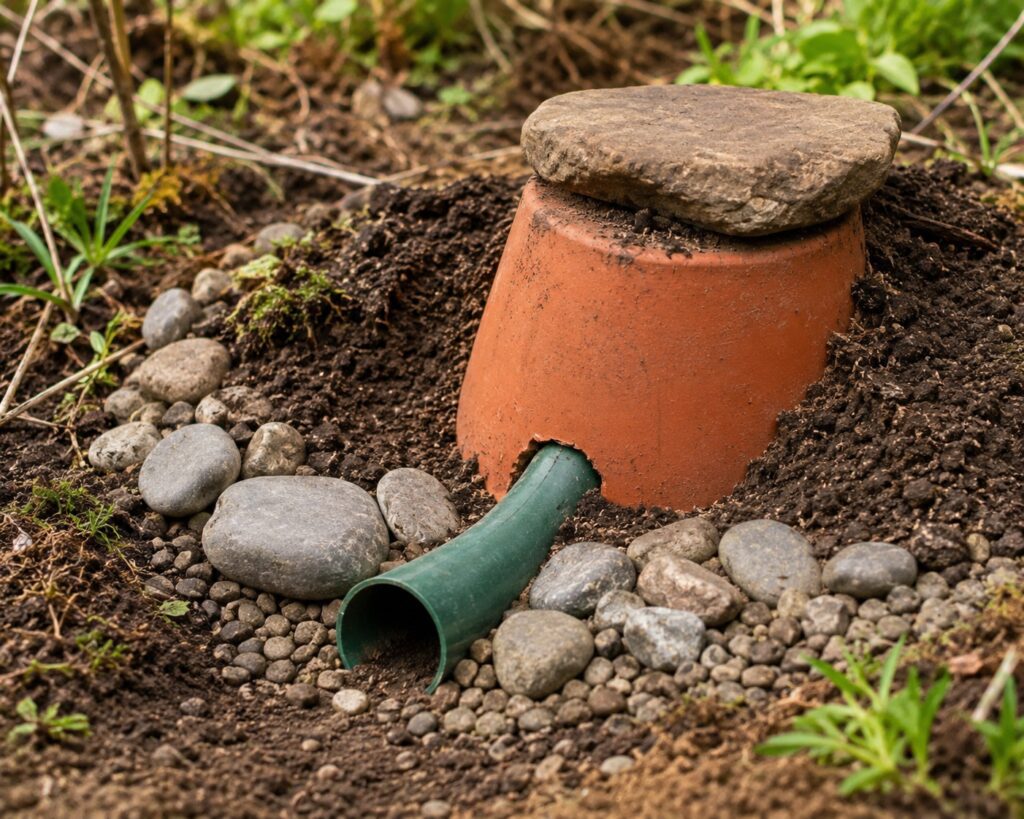
The stone on top of the pot is useful because it covers the drainage hole and gives extra stability. I would choose a flat stone that sits firmly without crushing the pot.
Around the base, I would add more small stones to reduce soil movement and make the setup look like part of the garden.
At this stage, the nest should look quiet and natural. I do not want it to stand out too much.
A bumblebee queen searching for a nest is looking for a safe, hidden place, not a decorative object.
What to Plant Nearby?
A nest is much more useful when there is food nearby. If I build a bumblebee nest, I also think about the flowers around it. Bumblebees need nectar and pollen, especially when queens emerge and begin searching for nest sites.
I would plant a mix of flowers that bloom at different times of the year.
Good choices include lavender, salvia, foxglove, borage, catmint, cosmos, clover, rosemary, thyme, echinacea, and native wildflowers suited to the local climate.
I also like leaving some parts of the lawn a little wild because clover and small wildflowers can feed pollinators.
The goal is to provide food from early spring through late summer. A nest without flowers nearby is like a house without a kitchen. The bees may visit, but they are less likely to stay.
I also avoid pesticides in that area. Even products labeled for garden use can harm pollinators.
For a bee friendly garden, the safest approach is to reduce chemical use as much as possible.
How to Maintain the Nest?
Once the nest is built, I mostly leave it alone. This is one of the hardest parts for many gardeners because we often want to check if something is working. But with bumblebees, too much checking can disturb them.
I would not lift the pot, move the hose, or open the chamber to see what is happening.
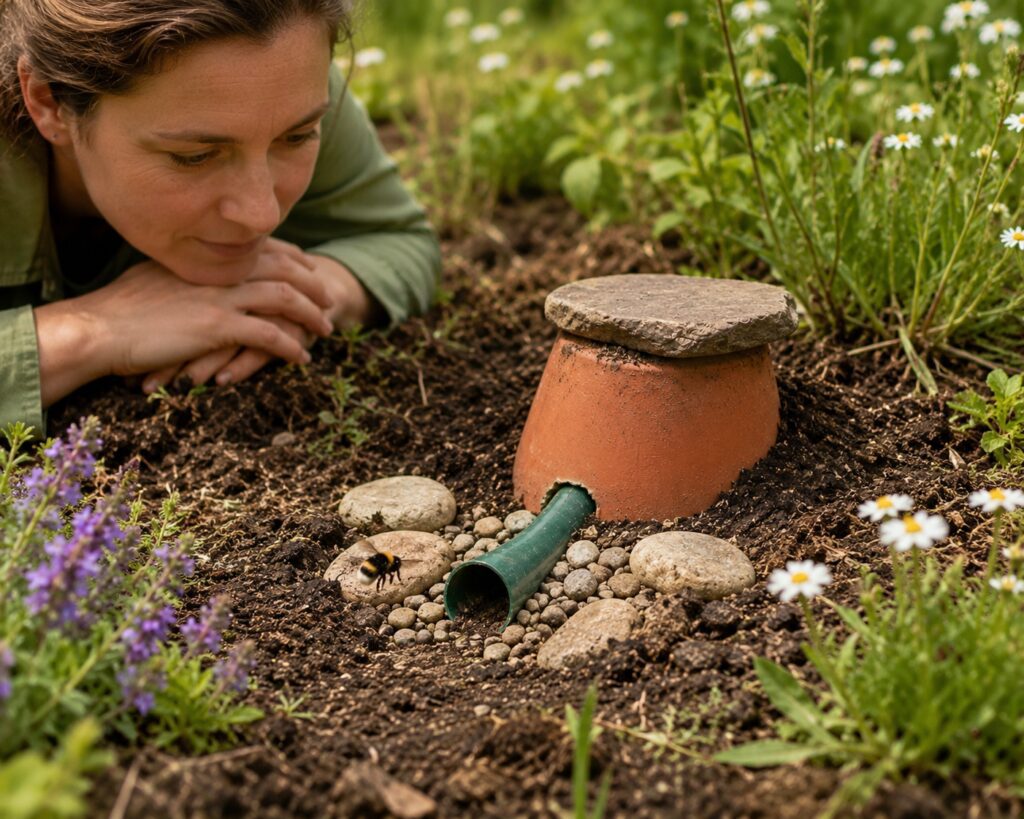
Instead, I quietly observe from a distance. If bumblebees are using it, I may see them entering and leaving the pipe. Their movement is usually calm and purposeful.
I avoid standing directly in front of the entrance or blocking their flight path.
If the nest is active, I leave it undisturbed until the season ends. Bumblebee nests are temporary, so patience is important. After the colony naturally finishes, usually later in the season, the nest can be cleaned and reset for the following year.
I would only refresh the nesting material when I am sure the nest is no longer active.
Important Safety Notes
Even though bumblebees are generally gentle, I always treat them with respect. I do not place a bumblebee nest where children might poke it, pets might dig it up, or people might accidentally step near the entrance.
A calm nest can become defensive if disturbed.
If someone in the household has a serious allergy to bee stings, I would be extra careful and consider whether this project is suitable. Helping pollinators is wonderful, but safety comes first.
I also remind myself not to move an active nest unless absolutely necessary. Moving bumblebee nests can confuse the bees and harm the colony.
If an active nest is in a dangerous location, it is better to contact a local bee or wildlife expert for advice.
The best bumblebee nest is one that stays quiet, protected, and undisturbed.
Common Mistakes to Avoid
When I look at this design, I can also see a few things that beginners should be careful about. The first mistake is choosing a spot that gets too much sun. A hot nest can become unsafe.
The second mistake is allowing water to enter the tunnel or pot. Drainage and slope matter a lot.
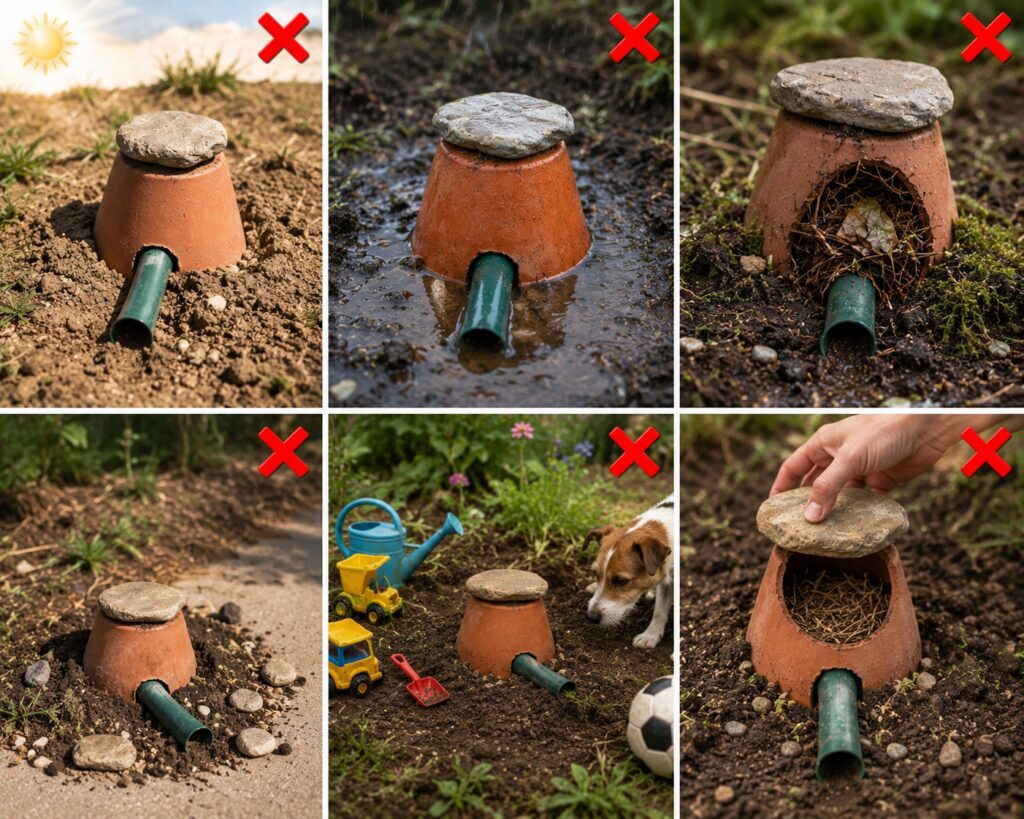
Another mistake is using damp or treated nesting material. Anything with chemicals, perfume, mold, or moisture should be avoided. I would also avoid making the entrance too obvious or too exposed.
A natural looking entrance is better.
Finally, I would not expect instant results. Sometimes a nest is used quickly, and sometimes it is ignored for a whole season. That does not mean the project failed.
Creating wildlife habitat is a long term act of care.


