The abundance of a fruitful garden can be both a blessing and a challenge. While the harvest brings joy and sustenance, it often results in an overabundance of fresh produce that can spoil quickly if not properly preserved.
Freezing and canning are common methods, but they require additional resources like electricity or space. What if you could preserve your harvest without the energy costs or space constraints?
Enter solar dehydrators.
Using the power of the sun to dehydrate your fruits, vegetables, and herbs is an eco-friendly, cost-effective way to preserve your garden bounty.
Table of Contents
Why Solar Dehydration is Important?
In today’s world, food waste is a significant issue. According to the Food and Agriculture Organization (FAO), around one-third of all food produced globally is wasted, with a large portion of this occurring at the household level.
The preservation of fresh produce not only helps reduce waste but also ensures a sustainable way to enjoy seasonal foods year-round.
Solar dehydration offers a simple yet effective solution that harnesses renewable energy, providing an alternative to energy-consuming appliances like electric dehydrators and refrigerators.
Additionally, dehydrating food retains most of its nutritional value, including vitamins and minerals that can be lost through other preservation methods like boiling.
The natural preservation process preserves the flavor, texture, and aroma of the produce, making it an excellent option for anyone who wants to keep their harvest in peak condition.
The Concept of Solar Dehydration
A solar dehydrator is essentially a solar-powered drying cabinet that uses the sun’s heat to remove moisture from food, preventing spoilage.
Unlike electric dehydrators, which rely on energy consumption, a solar dehydrator utilizes free and renewable solar energy. The dehydrator consists of a simple wooden frame enclosed in mesh screening, allowing air circulation while keeping pests at bay.
The concept is grounded in natural energy usage, making it an eco-friendly and sustainable preservation method.
Step-by-Step Guide to Building a Solar Dehydrator
Building a solar dehydrator is a rewarding and sustainable way to preserve your garden’s harvest without relying on electricity or bulky appliances.
By constructing a simple wooden frame with mesh screening, you can create an efficient drying cabinet that harnesses the power of the sun to remove moisture from fruits, vegetables, and herbs.
This step-by-step guide walks you through the process, from assembling the frame and creating the drying trays, to placing the dehydrator in the perfect sunny spot for optimal air circulation.
The result is a cost-effective, eco-friendly method that keeps your produce fresh, flavorful, and ready for long-term storage.
1. Gather Materials for the Frame
Start by collecting basic materials like furring strips or inexpensive lumber. The frame should be tall, narrow, and lightweight to ensure it can capture the maximum amount of sunlight.
You can purchase furring strips at a local hardware store, as they are inexpensive and perfect for this type of project.

- Materials needed:
- 2×2 lumber or furring strips (for the frame)
- Hinges for the door
- Screws and nails for assembly
- Mesh screening (for the sides and door)
- Wood glue (optional for extra stability)
Once you’ve gathered the materials, cut the lumber to create the four corners of the frame. Measure and cut the horizontal pieces that will make up the sides of the box and door.
Ensure the dimensions of the frame allow enough space for air circulation while being compact enough to fit in your garden.
2. Build the Frame
Assemble the wooden frame by securing the corners with screws or nails, creating a rectangular structure. Attach a hinged door to the front of the frame to allow easy access to the drying trays.

The door should be lightweight and easy to open so that you can place and remove food easily.
Key Tip: If you’re worried about the frame warping over time, you can apply a coat of weather-resistant sealant to protect the wood from moisture.
3. Create Drying Trays
The drying trays are a critical part of the solar dehydrator. These trays hold the food while allowing air to circulate underneath, ensuring even dehydration.

Use wooden frames slightly smaller than the interior of the solar dehydrator box. Stretch food-safe mesh or hardware cloth across the bottom of the tray and staple or tack it securely.
Why Mesh? The mesh allows air to flow through while preventing insects from making their way into your harvest. It also provides a stable surface for the produce to rest on while it dries.
4. Install Horizontal Runners Inside the Cabinet
Once the frame is complete, install horizontal runners inside the box. These thin strips of wood, spaced a few inches apart, will support the drying trays and keep them level.
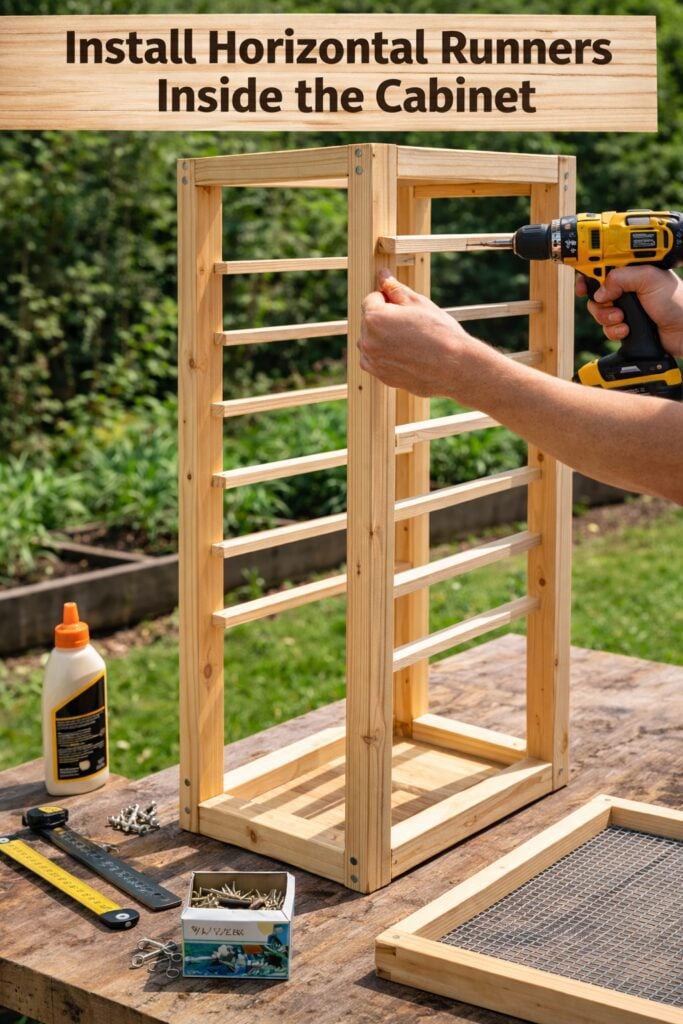
The runners should be installed in a way that allows you to stack multiple trays on top of one another without them touching. This design maximizes space and allows you to dry large quantities of produce.
Pro Tip: Make sure the runners are firmly attached to avoid any wobbling while stacking trays. This stability will help ensure consistent drying and prevent uneven results.
5. Place the Cabinet in the Right Spot

For the solar dehydrator to work efficiently, it must be placed in a location that gets plenty of sunlight and is well-ventilated. A sunny spot in your yard with good air circulation is ideal.
The location should be relatively dry and protected from excessive wind, which can blow the trays over or cause food to dry too quickly, resulting in uneven dehydration.
Key Tip: If you live in a particularly hot region, consider adding a small roof or covering to protect the dehydrator from excessive sun exposure that could overheat the food.
6. Use Your Solar Dehydrator
Now, it’s time to start dehydrating! Simply slice your fruits, vegetables, or herbs to an appropriate size and place them on the trays. Apples, tomatoes, peppers, herbs, and even mushrooms can be dehydrated using this method.
The sun’s heat, combined with the air circulating through the mesh, will gradually remove the moisture from the food.
Tip: For best results, check the food daily, rotating the trays if needed to ensure even drying. Depending on the weather, your food may be fully dehydrated in 1–2 days.
7. Storage and Preservation

Once your food is fully dried, it’s ready for storage. Store the dried produce in airtight containers or vacuum-sealed bags to keep moisture out.
A cool, dry storage area will help maintain the quality of your dehydrated food for up to a year.
Benefits of Solar Dehydration
- Eco-Friendly and Cost-Effective: Solar dehydration uses renewable energy from the sun, reducing the carbon footprint associated with traditional preservation methods like canning and freezing. It also helps lower energy costs, as no electricity is needed.
- Preserves Nutrients and Flavor: Unlike canning or freezing, solar dehydration helps retain the original flavor and nutrients of your produce, making it an excellent choice for anyone looking to maintain the integrity of their garden’s bounty.
- Space-Efficient: A solar dehydrator is vertical in design, which means it takes up very little space in your garden while offering ample capacity for drying large quantities of food.
Challenges and Considerations
While solar dehydration has numerous benefits, it may not be suitable for all climates. In regions with high humidity or inconsistent sunlight, the process could take longer and might not be as effective.
Additionally, it’s essential to keep the dehydrator clean and pest-free to ensure the safety and quality of your food.
Conclusion
Building a solar dehydrator is a simple and sustainable way to preserve your garden’s harvest while saving money and reducing food waste. By harnessing the power of the sun, you can extend the life of your fruits, vegetables, and herbs without relying on electricity or precious freezer space.
Not only will you reduce your environmental impact, but you’ll also enjoy flavorful, nutrient-rich food throughout the year.
As more people embrace sustainable gardening practices, solar dehydration could become an increasingly popular method of preserving food in communities around the world.


